Tutorials

Windows Installation

Tutorial - Automated Installation and Block Mining with Microsoft Windows

Install and mine blocks automatically with your Windows wallet.

The tutorial is compatible with Windows 10 and above.

Click here to download the bitcoinnew-auto.zip file.

Open File Explorer and go to your downloads directory.

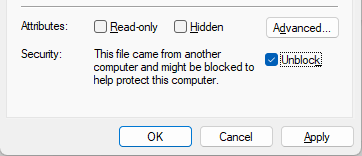
Right-click on the bitcoinnew-auto.zip file and select "Properties".

Select "Unblock".

Desbloquear

Press the "OK" button.

Extract the bitcoinnew-auto.zip file

Run install.bat to automatically install your wallet and mine your first block.

Linux Installation

Tutorial - Automated Installation and Block Mining with Ubuntu Desktop

Install and mine blocks automatically with your Linux wallet

The tutorial is compatible with Ubuntu Desktop 22.04 and above.

Click here to download the bitcoinnew-auto.sh file.

Open a Terminal window.

Make the installation file executable with the following command:

chmod +x $HOME/Downloads/bitcoinnew-auto.sh

Open Files and go to the Downloads directory.

Select the bitcoinnew-auto.sh file, right-click, and click "Run as a program" to automatically install your wallet and mine your first block.

Enter your Ubuntu user password when prompted.

Windows Mining

Tutorial - Block Mining with Microsoft Windows

Mine blocks with your Windows wallet and follow the instructions below.

Click here to download the bitcoinnew-qt-windows.zip file.

Open File Explorer and go to your downloads directory.

Extract the bitcoinnew-qt-windows.zip file

Open "Run" with the keyboard shortcut winkey + r.

Type the following text after "Open": notepad

Press the "OK" button.

Paste the following into Notepad.

rpcuser=rpc_bitcoinnew
rpcpassword=dR2oBQ3K1zYMZQtJFZeAerhWxaJ5Lqeq9J2
rpcbind=127.0.0.1
rpcallowip=127.0.0.1
listen=1
server=1
addnode=148.72.152.63 addnode=85.10.148.5 addnode=node4.bitcoinnew.org

Click the "File" menu item -> "Save as...".

The open dialog box will appear, click "Save as type" and select the "All files (*.*)" option.

Type the following text after "File name": bitcoinnew.conf

Click on the menu bar, type the following text %appdata% and press the Enter key.enter

Create the BitcoinNew folder and open it.

Press the "Save" button.

Create a new file with the keyboard shortcut ctrl + n.

Paste the following into Notepad.

@echo off
set SCRIPT_PATH=%cd%
cd %SCRIPT_PATH%
echo Press [CTRL+C] to stop mining.
:begin
 for /f %%i in ('bitcoinnew-cli.exe getnewaddress') do set WALLET_ADDRESS=%%i
 bitcoinnew-cli.exe generatetoaddress 1 %WALLET_ADDRESS%
goto begin


Click the "File" menu item -> "Save as...".

The open dialog box will appear, click "Save as type" and select the "All files (*.*)" option.

Type the following text after "File name": mine.bat

Click on the menu bar, open the location where you extracted the bitcoinnew-qt-windows.zip file.

Press the "Save" button.

Open your wallet and run mine.bat to mine your first block.

macOS Mining

Tutorial - Block Mining with macOS

Mine blocks with your macOS wallet and follow the instructions below.

Open Spotlight Search and type the following:

terminal

Click on the terminal.

Run the following command to open your downloads directory:

cd Downloads

Install Homebrew with the following command:

/bin/bash -c "$(curl -fsSL https://raw.githubusercontent.com/Homebrew/install/master/install.sh)"

Enter your sudo password to install Homebrew.

Install wget with the following command:

brew install wget

Download your macOS wallet with the following command:

wget "https://bitcoinnew.org/wallets/bitcoinnew-qt.dmg" -O bitcoinnew-qt.dmg

Download the macOS tools for your wallet with the following command:

wget "https://bitcoinnew.org/wallets/bitcoinnew-tools-macos.tar.gz" -O bitcoinnew-tools-macos.tar.gz

Extract the tar file with the following command:

tar -xzvf bitcoinnew-tools-macos.tar.gz

Create the data directory for your coin with the following command:

mkdir "$HOME/Library/Application Support/BitcoinNew/"

Open nano.

nano "$HOME/Library/Application Support/BitcoinNew/bitcoinnew.conf" -t

Paste the following into nano.

rpcuser=rpc_bitcoinnew
rpcpassword=dR2oBQ3K1zYMZQtJFZeAerhWxaJ5Lqeq9J2
rpcbind=127.0.0.1
rpcallowip=127.0.0.1
listen=1
server=1
addnode=148.72.152.63 addnode=85.10.148.5 addnode=node4.bitcoinnew.org

Save the file with the keyboard shortcut. ctrl + x

Access the bitcoinnew-tools-macos directory with the following command:

cd bitcoinnew-tools-macos

Open nano.

nano mine.sh -t

Paste the following into nano.

#!/bin/bash
SCRIPT_PATH=`pwd`;
cd $SCRIPT_PATH
echo Press [CTRL+C] to stop mining.
while :
do
./bitcoinnew-cli generatetoaddress 1 $(./bitcoinnew-cli getnewaddress)
done


Save the file with the keyboard shortcut. ctrl + x

Make the file executable.

chmod +x mine.sh

Open your downloads directory in Finder.

Install your macOS wallet with the bitcoinnew-qt.dmg file.

Open your wallet.

Return to your terminal and run the following command to mine your first block:

./mine.sh

Raspberry Pi Mining

Tutorial - Block Mining with Raspberry Pi OS

Mine blocks with your Raspberry Pi wallet and the instructions below.

The tutorial is compatible with Raspbian 11 (bullseye) and above.

Click the Terminal application icon in your dock.

Update your Raspberry Pi with the following command:

sudo apt-get update && sudo apt-get upgrade -y

Disable the swap file on your Raspberry Pi with the following command:

sudo dphys-swapfile swapoff

Open nano.

sudo nano /etc/dphys-swapfile

Change the value "CONF_SWAPSIZE=100" to "CONF_SWAPSIZE=1024".

Save the file with the keyboard shortcut ctrl + x.

Reinitialize the swap file with the following command:

sudo dphys-swapfile setup

Start the swap file with the following command:

sudo dphys-swapfile swapon

Download your coin's wallet with the following command:

wget "https://bitcoinnew.org/wallets/bitcoinnew-qt-raspberry.tar.gz" -O bitcoinnew-qt-raspberry.tar.gz

Type the following command to extract the tar file:

tar -xzvf bitcoinnew-qt-raspberry.tar.gz

Type the following command to install the wallet and tools for your coin:

sudo mv qt/bitcoinnew-qt bitcoinnewd bitcoinnew-cli bitcoinnew-tx /usr/bin/

Create the data directory for your coin with the following command.

mkdir $HOME/.bitcoinnew

Open nano.

nano $HOME/.bitcoinnew/bitcoinnew.conf -t

Paste the following into nano.

rpcuser=rpc_bitcoinnew
rpcpassword=dR2oBQ3K1zYMZQtJFZeAerhWxaJ5Lqeq9J2
rpcbind=127.0.0.1
rpcallowip=127.0.0.1
listen=1
server=1
addnode=148.72.152.63
addnode=85.10.148.5
addnode=node4.bitcoinnew.org

Save the file with the keyboard shortcut ctrl+ x.

Open nano.

nano ~/Desktop/mine.sh -t

Paste the following into nano.

#!/bin/bash
SCRIPT_PATH=`pwd`;
cd $SCRIPT_PATH
echo Press [CTRL+C] to stop mining.
while :
do
 bitcoinnew-cli generatetoaddress 1 $(bitcoinnew-cli getnewaddress)
done


Save the file with the keyboard shortcut ctrl + x.

Make the file executable.

chmod +x ~/Desktop/mine.sh

Open nano.

nano ~/Desktop/BitcoinNew-qt.sh -t

Paste the following into nano.

bitcoinnew-qt

Save the file with the keyboard shortcut ctrl+ x.

Make the file executable.

chmod +x ~/Desktop/BitcoinNew-qt.sh

Go to the desktop (GUI) of your Raspberry Pi.

Open the BitcoinNew-qt.sh file, press the "Run" button to start your wallet.

Go to the desktop, open the mine.sh file, and press the "Run in Terminal" button to mine your first block.
Staking on Windows

Tutorial - Staking Coins with Microsoft Windows

Earn coins with your Windows wallet by following the instructions below.

Click here to download the bitcoinnew-qt-windows.zip file.

Open File Explorer and go to the Downloads directory.

Extract the bitcoinnew-qt-windows.zip file

Open your wallet.

Optional: unlock your wallet for staking.

Go to Settings -> Unlock Wallet.

Check the "*Check only for staking" option.

Enter your password after the text "Enter your password".

Click the "OK" button.

Staking can only be generated when you have coins in your wallet.